Restoring a Classic Spectrum Analyzer Part 2 - Preparation
05/04/13 09:15
In this article I will describe how I received my 70000 spectrum analyzer, evaluated its status and configuration, and prepared for its reconfiguration and refurbishment.
When I received the unit, it came in two rugged boxes designed for transporting heavy test equipment. I was relieved to see that it was well packed and looked like there was no shipping damage or accidents. I unpacked the two sections and quickly connected it together and applied AC power to make sure it was not dead on arrival or worse, smoke! I was relieved to see that it powered up ok and even better there were no error messages! The 70310A precision reference reported a cold oven error which was to be expected since it had no time to warm up. Initial observations were that the 70004 display had a distinctly purple over-bias; however it was bright enough and not out of focus. The unit smelled musty and had accumulations of dust and grime as one would expect from an active service life in an ATE setup. Another observation was that the unit was not fitted with HP branded MSIB cables. Instead, it came with a set of roughly assembled home-made cables made from surplus multi-core wire bundles and 37-pin D connectors/shells. While they looked very DIY, they clearly worked as there were no issues with mainframe-to-mainframe communication. The last observation was that the unit was missing 3 blank filler panels used to cover unoccupied MMS slots. My opinion is that these blank filler panels are more than just cosmetic, but they also help manage airflow in the instrument for better cooling and reduce the amount of ingested contamination. I performed some detailed BIT tests and the unit passed! I then attempted to perform a self-calibration using the built in 300 MHz calibration source. It took quite some time, but I was immensely relieved that it completed and reported no errors. Lastly, I connected a microwave synthesizer (Giga-tronics GT9000) and injected several test signals. I could perform all measurements wideband and close-in and everything looked as expected and measurements appeared to be stable and repeatable. This gave me an enormous sense of relief, since you can never be certain about the true operating status and condition of a used instrument until you receive it. Often, instrument vendors/re-sellers don’t have the technical depth, or even when they do, don’t perform enough significant tests to verify and convince potential customers that an instrument is truly performing as advertised–a scenario which I have experienced a few times!
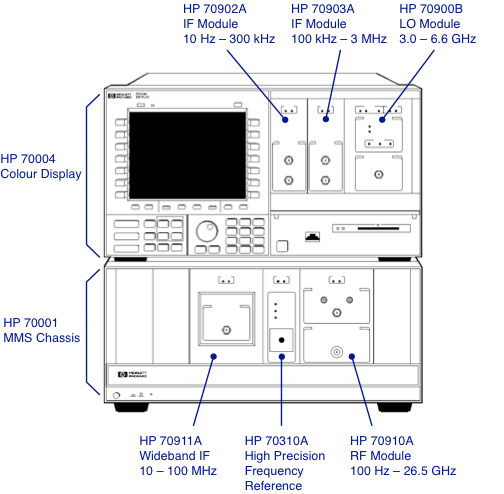
As I had mentioned previously, this unit surprisingly did not come fitted with a 70903A IF module (100 kHz to 3 MHz). I suspect it had failed at some point and was removed, yet continued to be useful without it (another advantage of modular hardware). Also, this unit was unusually configured from a physical point of view in that virtually all of the MMS modules (except the 70902A IF module) were installed in the secondary 70001A 8-slot mainframe. This meant that the 70001A power supply was burdened with providing the bulk of the power consumption of the entire instrument since the two most power consuming modules (the 70910A RF module and 70900B LO module) were contained in this chassis. I had decided at this point that I would physically reconfigure the instrument in the same configuration that HP supplied the instrument when new. This is shown below:
In getting to this configuration, I had a new shopping list to make! I also decided to install the instrument into a small mobile 19” rack with a dedicated rackmount PC connected via GPIB. This would allow the use of automated measurement software (e.g. phase noise measurement) and more importantly, to function as a virtual “plotter/printer” for capturing RF trace data. Aside from making the analyzer more portable in the lab, putting the analyzer into a mobile rack gives it physical protection from accidental impacts and bumps, protects the rear interconnecting cables and also allows the instrument to have a dedicated surge suppressor / AC line filter which will also be installed into the rack.
I put together a two lists of items required to support this new configuration. The first list is for items required for the analyzer itself:
1) HP 70903A IF section (100 kHz – 3 MHz)
2) HP rackmount ears 8-3/4” (5U) for the 70004A
3) HP rackmount kit 7” (4U) for the 70001A
4) 3x HP blank cosmetic filler panels 1/8-MMS slot width
5) 22” semi-rigid RF cable SMA(M)-SMA(M) to connect the LO module to the RF module
6) 10x various length SMB-SMB RF coaxial cables to re-wire the rear interconnect with this new configuration
7) SMA coax adapter (M-F) to serve as a sacrificial connector saver on the RF input
The second list is for items to install the analyzer into a portable mobile rack configuration:
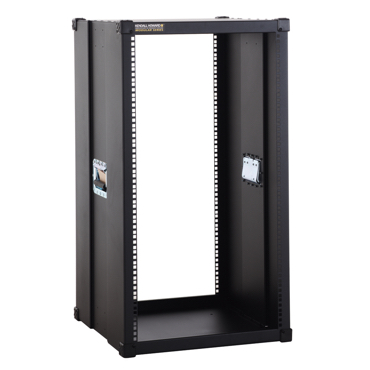
1) 20U Portable rack. I chose a Kendall Howard (1920-3-000-20) unit which I had good previous experience with when rack-mounting all of my RF sources. It is shown below:
2) Portable rack caster wheel kit (Kendall Howard 0013-2-004-00A)
3) Rackmount full depth shelf rated to 300 lbs (Kendall Howard 1904-1-001-01A)
4) Rackmount 1U AC surge-suppressor power bar (Tripp Lite DRS-1215)
5) 2U Rackmount PC server
6) 19” LCD display
7) Keyboard/mouse combo
8) National Instruments PCI-GPIB card (short height)
9) Agilent GPIB cable 10833D, 0.5 m
10) various rackmount cage nuts, screws
Most of the items on the first list I was able to obtain from various sources such as eBay. In particular, my good fortune at finding my spectrum analyzer continued, when I found another Canadian source for the HP 70903A IF module. Its price was almost too good to be true, but I felt I did not have that much to lose. Fortunately, when I did receive it, I was relieved to discover that not only was it in good condition, but it also worked!
The second list of items I obtained new from various online retailers. It may seem like a significant cost above the cost of the instrument itself, but I consider this to be a good investment. It will serve to protect the instrument, make it more portable, and extend its functionality with the use of additional software running on the PC connected via GPIB.
Armed with a re-configuration plan and some additional materials, I could start the process of refurbishment and reconfiguration. In part 3 of this article series, I will describe the process of stripping down and carefully refurbishing the 70000 spectrum analyzer to pristine condition!
When I received the unit, it came in two rugged boxes designed for transporting heavy test equipment. I was relieved to see that it was well packed and looked like there was no shipping damage or accidents. I unpacked the two sections and quickly connected it together and applied AC power to make sure it was not dead on arrival or worse, smoke! I was relieved to see that it powered up ok and even better there were no error messages! The 70310A precision reference reported a cold oven error which was to be expected since it had no time to warm up. Initial observations were that the 70004 display had a distinctly purple over-bias; however it was bright enough and not out of focus. The unit smelled musty and had accumulations of dust and grime as one would expect from an active service life in an ATE setup. Another observation was that the unit was not fitted with HP branded MSIB cables. Instead, it came with a set of roughly assembled home-made cables made from surplus multi-core wire bundles and 37-pin D connectors/shells. While they looked very DIY, they clearly worked as there were no issues with mainframe-to-mainframe communication. The last observation was that the unit was missing 3 blank filler panels used to cover unoccupied MMS slots. My opinion is that these blank filler panels are more than just cosmetic, but they also help manage airflow in the instrument for better cooling and reduce the amount of ingested contamination. I performed some detailed BIT tests and the unit passed! I then attempted to perform a self-calibration using the built in 300 MHz calibration source. It took quite some time, but I was immensely relieved that it completed and reported no errors. Lastly, I connected a microwave synthesizer (Giga-tronics GT9000) and injected several test signals. I could perform all measurements wideband and close-in and everything looked as expected and measurements appeared to be stable and repeatable. This gave me an enormous sense of relief, since you can never be certain about the true operating status and condition of a used instrument until you receive it. Often, instrument vendors/re-sellers don’t have the technical depth, or even when they do, don’t perform enough significant tests to verify and convince potential customers that an instrument is truly performing as advertised–a scenario which I have experienced a few times!
As I had mentioned previously, this unit surprisingly did not come fitted with a 70903A IF module (100 kHz to 3 MHz). I suspect it had failed at some point and was removed, yet continued to be useful without it (another advantage of modular hardware). Also, this unit was unusually configured from a physical point of view in that virtually all of the MMS modules (except the 70902A IF module) were installed in the secondary 70001A 8-slot mainframe. This meant that the 70001A power supply was burdened with providing the bulk of the power consumption of the entire instrument since the two most power consuming modules (the 70910A RF module and 70900B LO module) were contained in this chassis. I had decided at this point that I would physically reconfigure the instrument in the same configuration that HP supplied the instrument when new. This is shown below:
In getting to this configuration, I had a new shopping list to make! I also decided to install the instrument into a small mobile 19” rack with a dedicated rackmount PC connected via GPIB. This would allow the use of automated measurement software (e.g. phase noise measurement) and more importantly, to function as a virtual “plotter/printer” for capturing RF trace data. Aside from making the analyzer more portable in the lab, putting the analyzer into a mobile rack gives it physical protection from accidental impacts and bumps, protects the rear interconnecting cables and also allows the instrument to have a dedicated surge suppressor / AC line filter which will also be installed into the rack.
I put together a two lists of items required to support this new configuration. The first list is for items required for the analyzer itself:
1) HP 70903A IF section (100 kHz – 3 MHz)
2) HP rackmount ears 8-3/4” (5U) for the 70004A
3) HP rackmount kit 7” (4U) for the 70001A
4) 3x HP blank cosmetic filler panels 1/8-MMS slot width
5) 22” semi-rigid RF cable SMA(M)-SMA(M) to connect the LO module to the RF module
6) 10x various length SMB-SMB RF coaxial cables to re-wire the rear interconnect with this new configuration
7) SMA coax adapter (M-F) to serve as a sacrificial connector saver on the RF input
The second list is for items to install the analyzer into a portable mobile rack configuration:
1) 20U Portable rack. I chose a Kendall Howard (1920-3-000-20) unit which I had good previous experience with when rack-mounting all of my RF sources. It is shown below:
2) Portable rack caster wheel kit (Kendall Howard 0013-2-004-00A)
3) Rackmount full depth shelf rated to 300 lbs (Kendall Howard 1904-1-001-01A)
4) Rackmount 1U AC surge-suppressor power bar (Tripp Lite DRS-1215)
5) 2U Rackmount PC server
6) 19” LCD display
7) Keyboard/mouse combo
8) National Instruments PCI-GPIB card (short height)
9) Agilent GPIB cable 10833D, 0.5 m
10) various rackmount cage nuts, screws
Most of the items on the first list I was able to obtain from various sources such as eBay. In particular, my good fortune at finding my spectrum analyzer continued, when I found another Canadian source for the HP 70903A IF module. Its price was almost too good to be true, but I felt I did not have that much to lose. Fortunately, when I did receive it, I was relieved to discover that not only was it in good condition, but it also worked!
The second list of items I obtained new from various online retailers. It may seem like a significant cost above the cost of the instrument itself, but I consider this to be a good investment. It will serve to protect the instrument, make it more portable, and extend its functionality with the use of additional software running on the PC connected via GPIB.
Armed with a re-configuration plan and some additional materials, I could start the process of refurbishment and reconfiguration. In part 3 of this article series, I will describe the process of stripping down and carefully refurbishing the 70000 spectrum analyzer to pristine condition!